
Happy Valentine's Day. I thought I'd share one of my favorite family traditions. Years ago, when we only had one child, I was planning a candlelight dinner on Valentine's Day. I got our 2 1/2 year old to bed early and started making a romantic dinner. My husband was gone, so it was perfect...it would be a fun surprise when he arrived home. On a student budget, I had planned and saved so we could have steak and shrimp. The meal would be finished off with my husband's favorite dessert, hot fudge pudding cake! Dinner was about ready when Tom got home. Little footsteps could then be heard coming into the kitchen. My sweet little boy had awakened and wanted to see his daddy. We pulled up his high chair and he was so excited to join us for our romantic candlelight Valentine dinner. He then kept asking when we could have shrimp again. Needless to say, Valentines is not a romantic dinner at our home, it is now a family event. It has been about 15 years and every February 14, we have a steak and shrimp family dinner. I try to make it special by using our good china and goblets as well as decorating the table. Every one of our children look forward to our FAMILY Valentine's dinner. What is one of your favorite Valentine's traditions? I'd love new ideas.
Amy
Showing posts with label Holidays. Show all posts
Showing posts with label Holidays. Show all posts
Monday, February 14, 2011
Wednesday, March 31, 2010
April Fools Day Dinner

Dear Kate,
With April Fools Day being only a couple of days away, I thought I'd share a tradition we have. Our kids love the dinner we typically have that night. It's nothing special... usually just spaghetti, salad, bread sticks and dessert. The different part is how it's served. I rename all of the menu items and also rename all of the utensils (we include very unusual ones). The children fill out their menus and then I serve them. Here is an example of the menu. The items in parenthesis are not included on their menu!
You are going on an adventure. You will come across some of the things listed during your dining activity.
Please put numbers 1-4 next to the items below.
Slimey Snakes (that would be the spaghetti)
Frog Bones (bread sticks)
Seaweed and moss (salad)
Mud (chocolate pudding)
Quick sand (milk)
Next pick four different items that you would like to take with you. Place numbers 1-4 next to them.
Shovel (ice cream scoop)
Screwdriver (butter knife)
Ax (pancake turner)
Rope (straw)
Arrow (Spatula)
Magic Wand (spoon)
Pitchfork (fork)
They are then served their number 1 item from the top of the list with their number 1 item at the bottom of the list to eat it with. They usually all have something different. Some start with dessert while others start with salad. They get their number two picks after they are done with number one. It is so fun to hear them and to see how creatively they eat with what they have. You'll have to try it as the boys get older. Even N. loved it last year and he was only two, but he did have his older siblings to watch. Wait a couple of years and let me know what you think!
Love,
Amy
Tuesday, March 30, 2010
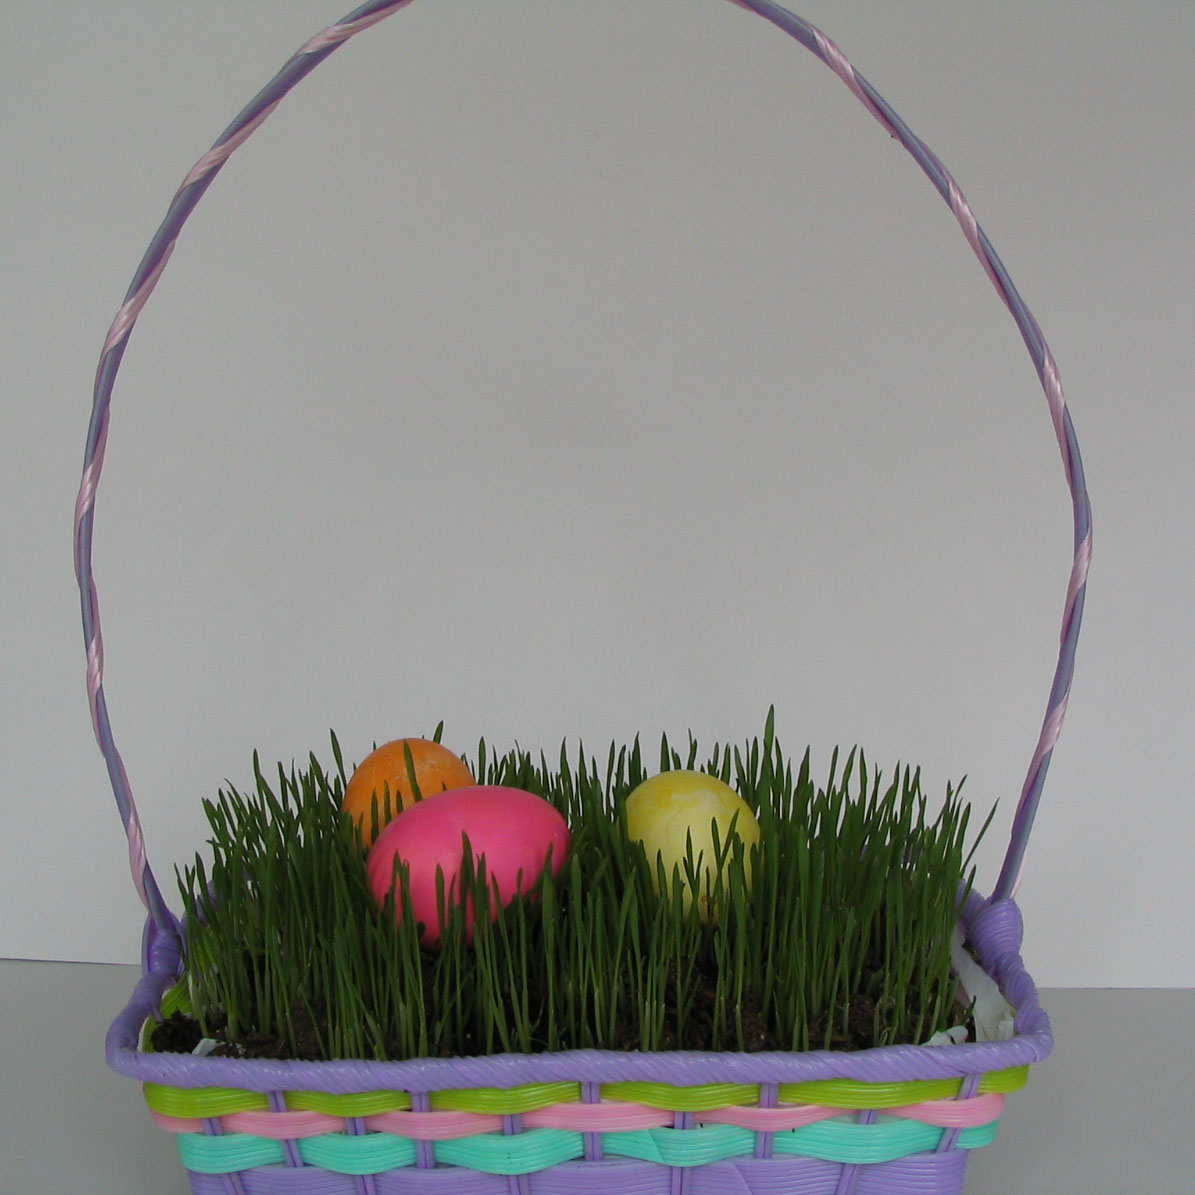
Tutorial: Easter Basket Grass
Kate,
I wanted to share one of the things I love doing for Easter. It's fast, east and always turns out! It's a fun one to have little hands help with. If you start now, you'll have a great Easter centerpiece just in time. Here's what you do.

Line an Easter basket with plastic. I used a plastic basket as well so that if I do have a little dirt on it that I want to rinse off when Easter is over, I'll have that option. I used a couple of plastic grocery bags to line it with. Fill that with dirt, make sure you don't get to much...the grass grew really well, so I wouldn't fill it to the top.
 Next I added wheat...yes that's right, plain old wheat. I just used the wheat that I grind for whole wheat flour. If you don't have whole wheat kernels, you can get them in bulk at a health food store or other stores. I then added a thin layer of dirt over the top, watered it, and put it in front of the window. It took 4 days to see good growth, but these photos are taken on day 5. I hope you'll try it and let me know how it works. I think it is so fun this time of year to have the real grass in the basket. We blew out some eggs and the kids colored them to add to the basket.
 Enjoy and Happy Easter!
Amy
This post it linked at A soft place to land
We are participating today on Get your craft on!

Friday, March 26, 2010
Tutorial: Happy Easter String Eggs

Kate,
I decided that we needed to make some fun Easter decorations. N. wanted to help. I remembered the string eggs from years ago and decided we'd make some. After a little research I decided that we'd bag the sugar-water approach and use thinned glue. It was a fun project and N. liked the outcome, but he said it was too hard for a 3 year old. I think it would work better with the older kids. Here's what we did.

You will need:
glue (I used Elmer's school glue)
paper plate
crochet yarn
small balloons blown up

Thin glue with a bit of water. I did this on a paper plate. After trying several things, I found that rolling the balloon in the glue mixture prior to wrapping with string worked best. This was the part N. really enjoyed. He was the balloon roller!

Wrap with string. Make sure you don't have any large spaces. Try to end with the string in an unnoticeable location.
Roll balloon in glue mixture again, making sure it is covered, but not to heavily. We did sprinkle some with glitter at this point, but I think I prefer the plain eggs.
 Hang to dry. Make sure you hang them where they can drip without ruining something. I hung them outside overnight and by morning, the eggs were hardened and the balloons were shriveled up and easy to remove with tweezers.


I wish we would have done some in yellow, but they were out of yellow crochet thread at the fabric store. I may make some more with the older kids. It was a fun project. We hung some from the rod in our living room as you can see. We also tried some in a basket. I have seen some bigger string eggs that then have an opening cut in the front and are filled with Easter grass and some small bunnies or something in them. So many possibilities! Let me know how you would display them.
Have a great day!
Amy

Wednesday, March 24, 2010
Pattern Review: Super Cute Bunny for the Kiddies
Dear Amy,
Good morning! So, this is our first Easter with the boys. I’m so excited. Remember how much fun we used to have as kids searching for our baskets? We couldn’t look for eggs until we’d found our basket. Mom and Dad always included such fun things in our baskets.
In sticking with our determination not to BUY, BUY, BUY, I’ve been pondering different things to include in the boys’ Easter baskets. The Internet is full of free patterns for those who know how to find them. One of my favorite sites for free sewing and knitting patterns and tips is Purl Bee, the blog for the store Purl Soho in New York. I. LOVE. THEM.
I’m making the Purl Rabbit for each of the boys for Easter this year. The lovely folks at Purl Soho also included free patterns for clothes for said rabbits. There’s also a dress pattern for Ms. Rabbit. So sweet!

I used a lightweight quilting cotton I had on hand for the body. It’s a pale green with white dots. Love it! I used a [plain brown embroidery thread, three strand, for the face.

If you look closely, you can still see the pale markings of the pencil I used to outline the face before I stitched it. I used a curved needle, which I would HIGHLY recommend when sewing faces on stuffed animals and dolls. It makes it so much easier.

I made two changes to the pattern. First, I sewed the ears on prior to sewing the body front and back together, instead of hand sewing them on after stuffing the body. Two, I added a line of stitching for knees in each leg. This makes the rabbit sit better. On my second rabbit, I think I’ll add elbows, too.
LOVED making this adorable woodland creature. It took about an hour and a half from start to finish…not bad at all. The boys are at ages where they love to dress and undress things, so the clothes are next on my list.
Have a great day! We’re headed out to enjoy the sunshine!
Love, Kate
Friday, January 22, 2010
Tutorial: Valentine Craft with the kids
Kate,
We decided it was time to make some decorations for Valentines...so, N (age 3) and E (age 6) joined me in making hearts. We decided that stained glass hearts would look great when the sun shines through our west windows! Here's what we did...
You will need:
Wax paper
Pink, red and white crayons
potato peeler
scissors
an iron
a couple of old rags


I started with a couple of sheets of wax paper (about 18" long) and shaved some crayons with the potato peeler. Obviously N needed help, but E was able to do it by herself.

When you have enough shavings, spread them around and place another piece of wax paper on top. I did move it to the ironing board first,
re-spreading the shavings and then put the other wax paper on top.

Now it's time to iron! Place a cloth on top of your ironing board, because I found out the hard way that it does bleed through a bit. Put another cloth on top and then iron with hot iron. Move it slowly until the crayon shavings have melted.


Next, we cut out hearts and hung them in the window. We just taped them to the window, but they would be cute hung with ribbons. This photo didn't turn out great, but you get the idea! They really do look fun as the light is shining through them. Enjoy...I think the boys would have a great time helping you with these.
Have a great day!
Amy
We decided it was time to make some decorations for Valentines...so, N (age 3) and E (age 6) joined me in making hearts. We decided that stained glass hearts would look great when the sun shines through our west windows! Here's what we did...
You will need:
Wax paper
Pink, red and white crayons
potato peeler
scissors
an iron
a couple of old rags


I started with a couple of sheets of wax paper (about 18" long) and shaved some crayons with the potato peeler. Obviously N needed help, but E was able to do it by herself.

When you have enough shavings, spread them around and place another piece of wax paper on top. I did move it to the ironing board first,
re-spreading the shavings and then put the other wax paper on top.

Now it's time to iron! Place a cloth on top of your ironing board, because I found out the hard way that it does bleed through a bit. Put another cloth on top and then iron with hot iron. Move it slowly until the crayon shavings have melted.


Next, we cut out hearts and hung them in the window. We just taped them to the window, but they would be cute hung with ribbons. This photo didn't turn out great, but you get the idea! They really do look fun as the light is shining through them. Enjoy...I think the boys would have a great time helping you with these.
Have a great day!
Amy
Subscribe to:
Posts (Atom)
