Showing posts with label Tutorial. Show all posts

Wednesday, December 7, 2011

Baking, Baking and More Baking…My Favorite Bread Recipe

So, I’ve been busy putting my new Bosch mixer to the test. I’ve tried Dayna’s favorite bread recipe (which is delish and I hope she’ll share it here with everyone!) and a few others in search of a good standby recipe.

I came across this recipe and made a few changes. It is really, really good. The bread is light and soft…great texture and not too dense.

Slice o'bread

Best Bread

  • 1/2 c warm water

  • 3 pkgs or 1.5 T active dry yeast

  • 1/4 c unbleached, all-purpose flour

  • 1 T white sugar

  • 4.5 c warm water

  • 1 c old-fashioned oats

  • 1 c wheat bran

  • 1/2 c flax

  • 2 c whole wheat flour

  • 1.5 T salt

  • 2/3 c brown sugar

  • 1/3 c olive oil

  • 1/3 c melted butter, cooled

  • 1/2 c vital wheat gluten

  • 9.5 c unbleached all-purpose flour

  • In the bowl of your mixer, add together first four ingredients. Mix on lowest setting until combined. Let sit 5 minutes to allow yeast to grow. Meanwhile, in a blender, blend together oats and flax seed until very coarsely ground.

  • Add to mixing bowl: water, oat/flax mixture, bran, wheat flour, salt, brown sugar, olive oil, butter and gluten. Mix on low speed 1 to 2 minutes. Increase speed. Add 1/2 to 1 cup of flour at a time until dough pulls away from side of bowl. Amount of flour will depend upon humidity. Dough may be sticky.

  • Place dough in oiled bowl and turn to coat surface. Cover with a damp cloth and place in a warm spot or on an oven mitt in a 150-degree oven. Allow to rise until the dough doubles in size or about an hour.

  • Divide the dough into 6 small sections (8“ pans) or 4 large sections (9” pans). Slap each section on the table to remove air pockets and form into loaves.

  • Place the loaves in greased bread pans and allow to rise another hour or until the dough is about an inch above the rim of the pans. Bake in a 350-degree oven for 35 minutes or until brown. Cool in the pan on a wire rack for 10 minutes, then turn loaves out of pans onto rack until cooled.

loaves

bread

Enjoy! Let me know what you think! Happy baking!

Monday, October 17, 2011

My First Canning Adventure!

I know, I know, all I've been writing about lately is food! Well, that's what my life is all about right now. I love living in a bigger house so that we have room for some food storage! FINALLY! As most of you already know, Rit and I bought a new refrigerator a couple of months ago. I LOVE THIS THING! I know it's silly to fall for an appliance, but it seriously makes my life so much easier. I love the extra space, the great lighting, and the filtered water in the door. I drink so much more water now! I hated washing and filling up our old Brita filter in the fridge before. Anyway, we also bought a freezer at the same time.

I have never had a separate stand-alone freezer. It's a whole new world. I. Love. It. I have been spending a lot of time lately roasting tomatoes, making soups with fresh local produce, and making vegetable and chicken stock...all for the freezer. I'm thrilled with the concept of being able to use local-produce-based, homemade foods all winter. Plus, as silly as it may sound, I find it really satisfying to "put up" food and to see what I've accomplished from this fresh, local produce. I know where it came from and how it was made. I love that!

After listening to Amy's stories of preserving, I decided to try to dehydrate some hot peppers and make our own chili powder. The peppers from the farmer's market were gorgeous and cheap (remember them from my last post?) We also harvested quite a few from our small garden. So, while wearing gloves, I sliced them length-wise in half and removed the seeds. I then dehydrated them. When they were nice and dry, I put them in my beloved Vitamix blender and turned them into powder.

If you try it, just be careful not to inhale when you take the lid off of the blender. It's potent stuff! But it smells heavenly. We can't wait to make chili this winter with our roasted tomatoes and homemade chili powder! Thanks for the idea, Ames!

The boys are in love with dehydrated apples, so I'm making as many as I can. We purchased apples CHEAP from a local orchard. We actually got a really good variety, too.


I bought two dehydrators cheap at a local factory store. They've been running almost non-stop since I bought them a couple of weeks ago. But, in lieu of a dehydrator, an oven can also be used to dehydrate apples. First peel, core and slice your apples. As you slice them, place them in an antibrowning bath. You can make the bath by crushing and dissolving 6 500mg vitamin C tablets in 2 c. of cold water or by adding 1/4 c. lemon juice to 2 c. cold water. After 10 minutes in the bath, remove and pat the apple slices dry. If using the oven method, place the slices on a cake cooling rack and place the rack in a 170 degree oven for about 3-4 hours. If using a dehydrator, place the apple slices on the racks in the dehydrator, careful not to overlap. The time in the dehydrator depends on the type of dehydrator. The slices are done with they are leathery and won't stick together when squeezed together. Cool and then place them in a covered container for one week. If there is no moisture in the container after one week, transfer the slices to an air-tight container and store for up to one year. If moisture is present, try dehydrating longer.


So aside from dehydrating and freezing, I tried my hand at canning this weekend...for the first time! I was a little intimidated, but I read a lot before I got started and I hope I did it right. I have to wait a little longer before checking to see if my jars sealed correctly.


I used a variety of apples. I did core them, but I didn't remove the skins as that is where so many nutrients are found.

I didn't add any sugar at all, just lemon juice and cinnamon. It's delicious! I canned 8 quarts so far and made some to keep in the fridge, which Rit has almost finished off already.

I am loving all of this preserving and I look forward to another week of it. It's getting me even more excited for my big garden next year. YEAH!

Love, Kate

Saturday, October 1, 2011

Burlap Curtains

We've lived in our house for about 4 months now, and we now have finished (almost) curtains over the front bay window! Progress! Unfortunately, the neighbors no longer get to see me nursing the twins on the couch whenever they pass by. Shucks. I'm sure they're heart-broken. 

One of the reasons it took me so long to get curtains up is that it takes me a while sometimes to figure out what I want. And since I always want something cheap that doesn't look cheap, that takes a while to find. Blinds are nice, but they're expensive, don't add much decoration wise, and wouldn't be very kid-friendly since the windows come all the way down to the window seat that is only 12 inches from the ground. Also, the front windows together are about 115 inches across. Large windows make curtains difficult because panels don't usually come any wider than about 52 inches, and certainly not discount curtains. And since a curtain rod that long needs to be supported in the middle, you can't even just get a third panel to cover the extra. You need four panels. So even if you get a set on sale for about $50-60, that's still over $100 to cover just one window. Anyway, I don't think you need any more of my thought process. Suffice it to say that was more than I wanted to pay.

Burlap crafts seem to be the rage right now, and I saw burlap curtains at The Old Painted Cottage that I wanted to give a try. By the way, I also TOTALLY want to do a sideboard similar to hers with shelves above it in my kitchen...all in good time. But just panels of burlap was too blah, so I wanted to add a ruffle accent as well. Here's what I did.

I measured the window and got enough burlap for four panels across. I rolled the burlap out on my floor and measured four lengths of about 93 inches. Then I sewed two panels together for each side. I then sewed a large 3-4 inch hem at the top and a small hem along the bottom. I didn't bother turning the edge under, because the burlap is fairly stiff. I just folded the fabric over once and hemmed. I also bought some 90 inch wide muslin for lining since we want a lot of privacy in that room. I measured it as well and hemmed the top, sides, and bottom. I did sew these together with a pocket to slide the rod through, but the muslin is too stiff to gather well when I want the curtains open, so we're just hanging the curtains with ring clips.


 Here's how I did the ruffle. Your ruffle fabric will need to be twice as long as the width of your curtains so that once you've "ruffled" it, it will still be long enough. I had four yards of fabric. Leaving it folded so I could cut two ruffle lengths at a time, I cut 4 inch strips. I don't mind a bit of a frayed look, so I didn't need extra fabric for turning the edges under for a hem. Since I don't have a rotary cutter and mat, I just laid the fabric on the ground. Using my tape measure, I made small slits along the edge at 4 inch intervals. Then moving the tape measure up, I cut up to those same increments on the tape measure. Once I had the strips started, I folded the strip up, keeping it flush with the left side of the fabric, to use as a guide in continuing to cut the length of my strip on the right hand side. I hope that makes sense. As you continue to cut, it goes much faster because you have more length on your strip to use as a guide. I cut four lengths. One for the top and bottom of both panels for my curtains. You may have to cut more strips and sew them together to get strips long enough to span the whole width of your curtain.
 

 I then separated my strips and sewed a 1/4 inch seam all around the strip to control the amount of fraying.
 
  To create the ruffle, I sewed down the middle of each strip, folding the fabric up about 1/4 inch, sewing 2-3 inches farther down and then folding the fabric under the opposite way. Then I sewed for an inch or so before starting the process again, creating a ruffle that has fabric in front and then behind if that makes sense.


 I then laid my burlap curtain on the ground and marked notches (with pencil right on the fabric since it will be covered by the ruffle) in a line 17 inches from the top and 14 inches from the bottom. I then sewed my ruffle down the line adding a thin blue ribbon detailing down the middle of my ruffle.


 Here's one of the panels while the curtains are open. How to deal with that big, dark fireplace decoratively will be future posts I'm sure.


 I hung the curtains with curtain rings by clipping the rings to the back of the curtain about 4 inches from the top.
 
Here are the panels closed for the night. The pictures aren't great, but the curtain turned out pretty cute. It's a really wide curtain, but I'm pretty pleased with the result. I'm shocked at how well the lines of ruffles match up. Sometimes things work out despite my mediocre skills. Huzzah! The burlap gives a really fun texture to the curtain and pattern when the sun shines on them.

A warning about working with this much burlap: It has a pretty strong smell that will need a few days to air out. It also will leave hairy fuzz all over the floor while you're working with it. But now that they've been up a while, the smell is gone, and I don't notice a problem with the fuzz.

So here's the end cost for the curtains across this enormous window and then across our french doors in the back. About 17 yards of burlap for $3/yd. (50% off coupon at JoAnn's) for $51. Muslin lining for for the front windows for $17 (Another 50% coupon). Four yards of ruffle fabric for $2/yd (on sale) for $8. The ribbon was on sale for $.50 for 10 yards. I used 2 spools for $1. Total cost: $77! Not too shabby. Another reason this project took so long is that I wanted 50% off and had to wait for those items to not be on sale so that I could actually get a better price with my coupon. I had one set of extra curtain rings from a previous project and bought a second set for $4 on sale. Then I had to buy a simple curtain rod for the french doors for $4 at Lowe's. It will be totally covered up all the time, so I could buy a simple rounded one. So even with the hardware, it was a pretty cheap project. It did take more time than I thought it would (projects always do for me), but even though that's a precious commodity for everyone, it isn't a commodity that comes out of my bank account. :)

Tuesday, April 20, 2010

Another birthday and a Flip Flop birthday cake


Kate,
What fun things you are doing. I hope to have a little more time after this week. Last weekend was great and very full. We had a birthday party, delayed family Easter party, scout campout, wedding reception and birthday dinner, let alone the other basic items that happen to keep a family running.

I wanted to show you the cake I made for Em. She wanted another princess cake, but after doing that for the past two years, I looked for another idea. She is a flip flop girl, so when I found this cake idea, I knew it was it!

Here's the link for the directions, but I wanted to let you know what worked for me. After cutting the flip flops out using their template, I froze the cake over night. I then put on a thin crumb coat of frosting and froze it again. I found this worked great to keep the crumbs from sticking to everything. I also neglected to get some silk flowers, so as you can see I made mine from the fruit rolls. I also used M&M's because that is what I had. She loved the cake and the family seemed to as well. All in all the birthday party, dinner and cake turned out well. I'll have to give you a run down on the party sometime. We had 9 little girls over for a "night at the spa". There were a lot of loud giggles, squeals, etc. The noise level was incredible, but they all seemed to have a great time!

I hope it was a great day at the park!
Love,
Amy

Tuesday, April 13, 2010

Tutorial: Tank birthday cake

Kate,
As you know, birthday season has started in our home. We are fairly consistent with birthdays from the end of March to the first of October. Fitting 8 birthday's in during that time is crazy, but fun. There are times when we don't even take down the crepe paper and balloons before the next celebration. I thought I'd share with you the cake I made for B. a couple of weeks ago. It is supposed to be a tank cake. Hopefully you can tell that! He loved it.
This is what I did...I mixed up a cake mix. (I know, not as good as from scratch, but that's all I could handle that day.) I poured the batter into a 9x13 pan and the rest in a greased and floured small metal bowl (make sure it can handle the heat of the oven). I baked them according to directions, baking the bowl cake longer. I have found that if you cut wax paper to fit your 9x13 pan and put it in the bottom before greasing and flouring it, the cake always comes out great.

After removing the cakes from the pans and letting them cool, I frosted them with B.'s frosting of choice, which is:
1 lg. pkg. pudding (chocolate in this case)
2 cups milk
1 8 oz. cool whip (or whipped cream...which is what I did this time)

Mix the pudding with milk and put in fridge until thick. Add cool whip or whipped cream. Let set a bit longer. Spread on cake. You do have to refrigerate the cake once frosted.

After frosting the cake I added chocolate sprinkles. One of my kids also rolled out a large tootsie roll for the tracks and we used small peanut butter cups on the inside of the track. The bowl cake was the turret and the cannon was part of another large tootsie roll. It was a lot of fun. Tuck this away for future reference. With two boys, I'm sure one year they will want an army themed birthday!
I can't wait to show you how the hoop house is coming in the garden. It will be nice to move my plants outside...they are taking over my living room!
Enjoy your day!
Amy

Tuesday, April 6, 2010

Tutorial: Jean top Skirt


Kate,
I finally finished a little skirt for E. She loves it. It twirls a little and she has a hard time standing still when she wears it. She loves to twirl! I took some jeans of hers that were a bit short and had a hole in the knee and this is how I reused them. I used the basics from this website.
It was very easy and turned out cute. I did let her pick the fabric, so it is very E.

First cut off jean top just below the zipper...make sure you leave enough room for a seam. I did cut off part of the back pockets, but I pulled up the inside of the front pockets so those weren't affected.
Then I cut the length of the fabric I wanted for the first tier...make sure it is at least twice as long as the jean width so you have enough to gather. I then gathered and attached it.


Continue to do that for the next layers making sure you increase the width of fabric for each tier so it is at least twice that of the previous layer. I then hemmed the bottom and top stitched each layer... that's it!


Very simple and fun for summer.
Enjoy your day!
Amy

Thursday, April 1, 2010

Tutorial Review: Toddler Sleeping Bag

Dear Amy,

Happy April! It’s getting warmer here,but not quite warm enough. So, we spent Tuesday night at a nearby resort with a huge indoor water park…a little spring break vacation to get us ready for upcoming summer trips. We only stayed one  night, but we had a wonderful time. The boys loved it. The water park was a huge hit. Eric, age 1, was fearless and his 2-year-old brother, D, was much less so.

This was a bit of a test run for our big road trip to Utah this summer. I’m so excited! Last year, we were somewhat nervous to make the drive as brand new parents with an infant and a one-year-old. But the sheer volume of necessary baby gear was far more overwhelming than the actual drive. We had such a fun time! I’m looking forward to the trip this summer even more. The boys are a little older now and I can only imagine that travel with a two-year-old and a very alert one-year-old will be much more…um…exciting.

I’ve started to get a few things ready for our road trip. I’m nothing if not a super planner. I found a great tutorial for a toddler sleeping bag on Ruffles and Stuff. I got the basic idea from Disney on her blog, but I tweaked the concept quite a bit.

I used a shower curtain from IKEA for the exterior fabric and a soft flannel I already had for the interior. I used four layers of batting as she suggested. I measured D and determined finished dimensions of 50” wide (when laid flat) and 39” long for the sleeping bag. I wanted it to be big enough for him to move around, but not big enough for him to get lost in.

D sleeping bag 2

As you can see, I did use a zipper. I found a 34” parka zipper at Joann’s on sale for $1.49. Joann’s has an awesome variety of zippers. They even have 100” sleeping bag zippers. I had never seen those before. You could easily use one of those to go down the side and around the bottom and simply cut it and sew across it a few times as a stopper. I went with the parka zipper and used it down one side. I sewed the bottom shut.

D sleeping bag

I left about five inches from the top of the zipper and the top of the sleeping bag so that I could easily pull it back and so that he would have more air when he buries his head. He tends to snuggle down when he sleeps. So sweet.

Anyway, I basically finished the top with a binding, like you would for a quilt, but I machine-sewed it. After a washing, the sleeping bag really fluffed up.

Our overnighter at the resort was a good test drive for D and his new sleeping bag. He was so excited to try it out. He slept soundly and long. I’m ecstatic. Not having to lug two portable cribs into every hotel seemed a distant dream…

NO. LONGER.

Yeah! Eric’s is almost finished. He’s much more mobile and quite a bit sassier than D. I’m not sure a sleeping bag will work for him. He may not stay put. But, it is almost finished and we’ll give it a test run here at home. Wish me luck!

What do you think, Internet…where do your toddlers sleep on road trips?

Love, Kate

Tuesday, March 30, 2010

Tutorial: Holey Knees Make the Perfect Boy’s Shorts

Dear Amy,

So yes, another pair of D’s pants has bitten the dust. The boy plays so hard! These were especially tragic for me to lose. I LOVED these pants. I bought them off eBay…Mini Boden brand, a little baggy, SO CUTE!

Inevitably, D’s hectic play schedule has claimed this casualty. Sad. Fortunately, though, this particular pair of pants lends itself perfectly to becoming a cutesy pair of summer shorts. Hooray! Big smiles! I neglected to take a “before” picture of said pants (due to my crazy excitement to complete the transformation), but you get the idea from this picture.

3-30 pants

The pants just happened to have a conveniently located seam mid-leg. I cut directly below that seam to remove the legs. I then machine sewed two patches on…one on each leg, large enough to cover the holes and thinning fabric.

3-30

I wanted some STRONG patches, so I used home decor-weight fabric and double layered it. I love the look of the unfinished, frayed edges, so I left them unfinished.

3-30 patch

I simply sewed around the edges of the patch and then sewed in an X pattern across the center to keep it securely in place. D loves his new shorts and this mama is delighted not to lose one of her favorite pairs of D’s pants. Saved the pants and re-used scrap fabric. Now that’s what I call success. Bring on the summer sun…we’re ready!

Love, Kate

p.s. Here are some projects I’m working on that I can’t wait to tell you about: toddler sleeping bags for the boys, road trip activities for toddlers, spring/summer wreath reusing old t-shirts, clothes for the Easter bunnies, and a fabulous blanket for Eric made from recycled sweatshirts.

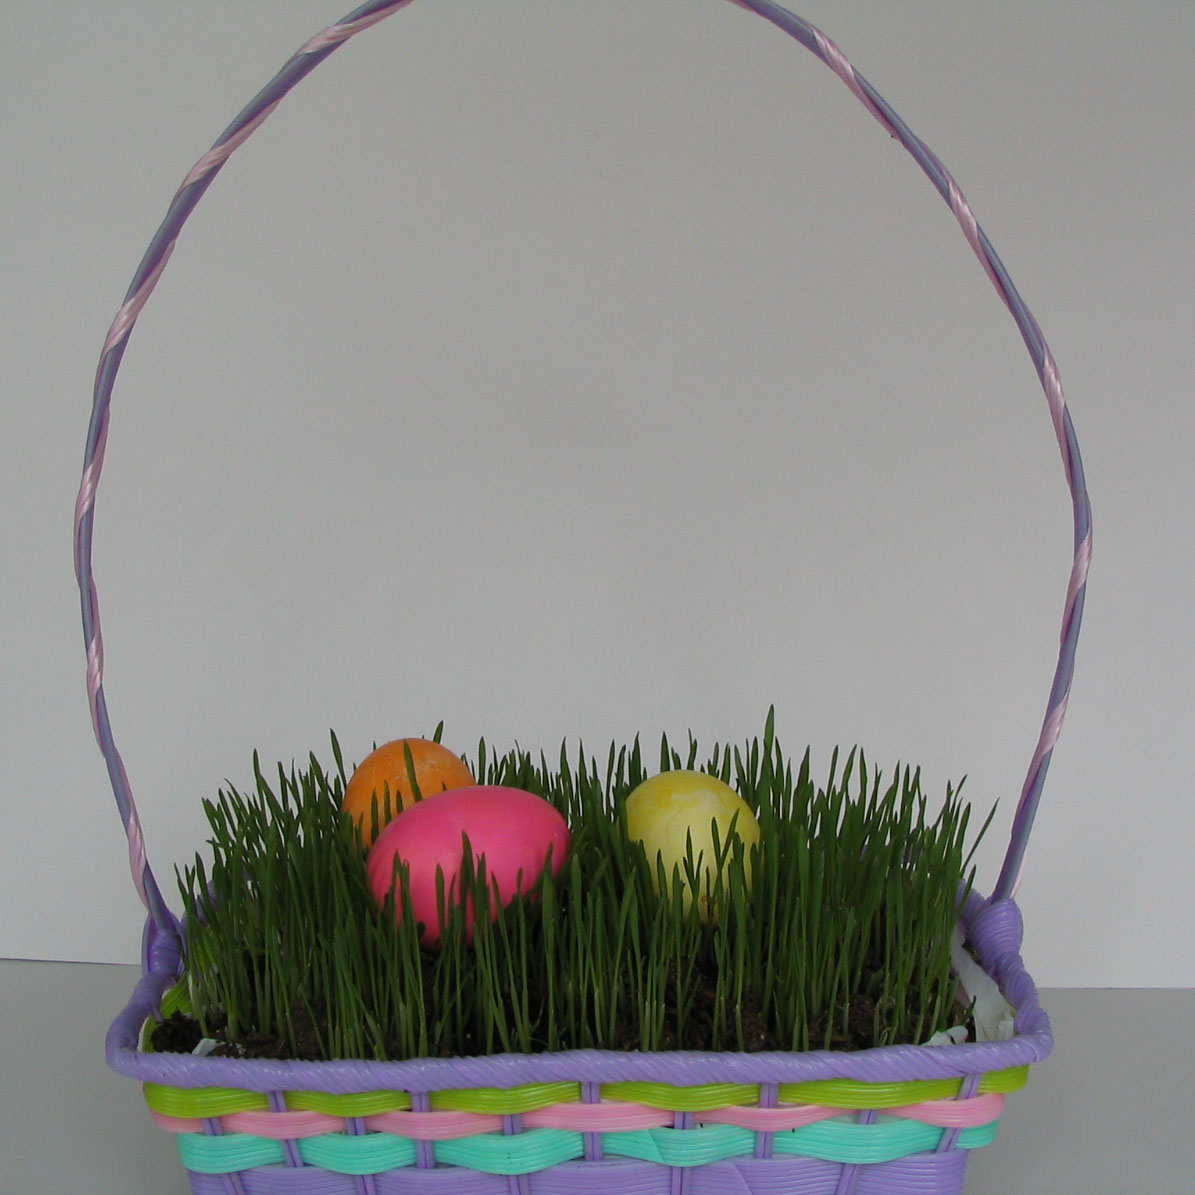
Tutorial: Easter Basket Grass


Kate,
I wanted to share one of the things I love doing for Easter. It's fast, east and always turns out! It's a fun one to have little hands help with. If you start now, you'll have a great Easter centerpiece just in time. Here's what you do.


Line an Easter basket with plastic. I used a plastic basket as well so that if I do have a little dirt on it that I want to rinse off when Easter is over, I'll have that option. I used a couple of plastic grocery bags to line it with. Fill that with dirt, make sure you don't get to much...the grass grew really well, so I wouldn't fill it to the top.
Next I added wheat...yes that's right, plain old wheat. I just used the wheat that I grind for whole wheat flour. If you don't have whole wheat kernels, you can get them in bulk at a health food store or other stores. I then added a thin layer of dirt over the top, watered it, and put it in front of the window. It took 4 days to see good growth, but these photos are taken on day 5. I hope you'll try it and let me know how it works. I think it is so fun this time of year to have the real grass in the basket. We blew out some eggs and the kids colored them to add to the basket.


Enjoy and Happy Easter!
Amy

This post it linked at A soft place to land
We are participating today on Get your craft on!

Friday, March 26, 2010

Tutorial: Happy Easter String Eggs


Kate,
I decided that we needed to make some fun Easter decorations. N. wanted to help. I remembered the string eggs from years ago and decided we'd make some. After a little research I decided that we'd bag the sugar-water approach and use thinned glue. It was a fun project and N. liked the outcome, but he said it was too hard for a 3 year old. I think it would work better with the older kids. Here's what we did.

You will need:
glue (I used Elmer's school glue)
paper plate
crochet yarn
small balloons blown up


Thin glue with a bit of water. I did this on a paper plate. After trying several things, I found that rolling the balloon in the glue mixture prior to wrapping with string worked best. This was the part N. really enjoyed. He was the balloon roller!


Wrap with string. Make sure you don't have any large spaces. Try to end with the string in an unnoticeable location.

Roll balloon in glue mixture again, making sure it is covered, but not to heavily. We did sprinkle some with glitter at this point, but I think I prefer the plain eggs.

Hang to dry. Make sure you hang them where they can drip without ruining something. I hung them outside overnight and by morning, the eggs were hardened and the balloons were shriveled up and easy to remove with tweezers.


I wish we would have done some in yellow, but they were out of yellow crochet thread at the fabric store. I may make some more with the older kids. It was a fun project. We hung some from the rod in our living room as you can see. We also tried some in a basket. I have seen some bigger string eggs that then have an opening cut in the front and are filled with Easter grass and some small bunnies or something in them. So many possibilities! Let me know how you would display them.
Have a great day!
Amy

Wednesday, March 24, 2010

Pattern Review: Super Cute Bunny for the Kiddies

Dear Amy,

Good morning! So, this is our first Easter with the boys. I’m so excited. Remember how much fun we used to have as kids searching for our baskets? We couldn’t look for eggs until we’d found our basket. Mom and Dad always included such fun things in our baskets.

In sticking with our determination not to BUY, BUY, BUY, I’ve been pondering different things to include in the boys’ Easter baskets. The Internet is full of free patterns for those who know how to find them. One of my favorite sites for free sewing and knitting patterns and tips is Purl Bee, the blog for the store Purl Soho in New York. I. LOVE. THEM.

I’m making the Purl Rabbit for each of the boys for Easter this year. The lovely folks at Purl Soho also included free patterns for clothes for said rabbits. There’s also a dress pattern for Ms. Rabbit. So sweet!

rabbit

I used a lightweight quilting cotton I had on hand for the body. It’s a pale green with white dots. Love it! I used a [plain brown embroidery thread, three strand, for the face.

rabbit face

If you look closely, you can still see the pale markings of the pencil I used to outline the face before I stitched it. I used a curved needle, which I would HIGHLY recommend when sewing faces on stuffed animals and dolls. It makes it so much easier.

rabbit knees

I made two changes to the pattern. First, I sewed the ears on prior to sewing the body front and back together, instead of hand sewing them on after stuffing the body. Two, I added a line of stitching for knees in each leg. This makes the rabbit sit better. On my second rabbit, I think I’ll add elbows, too.

LOVED making this adorable woodland creature. It took about an hour and a half from start to finish…not bad at all. The boys are at ages where they love to dress and undress things, so the clothes are next on my list.

Have a great day! We’re headed out to enjoy the sunshine!

Love, Kate

Monday, March 22, 2010

Tutorial: Save those Kid's Pants with Patches!

Dear Amy,
Good morning! I hope you had a wonderful weekend. We enjoyed the sunny (but chilly) days bundled up and playing outside. We had our first fire in the chiminea over the weekend. We played and went on walks and dreamed of summer.

Contrary to what most of our townsfolk were wearing last week when it reached 60 degrees, it’s still not warm enough for shorts (and/or tube tops, people. Take note!). I mean, come on. It’s March…in Wisconsin…they don’t call it the frozen tundra for nothing.

So, it’s still long pants for us. DeAngelo own three pairs of jeans—all hand-me-downs. (Thanks, friends and family!) Over the past month, two of the three pairs have sprouted vents…directly over the heavy play area—his knees. I hate to buy him new pairs now because he’s smack dab in the middle of a growth spurt. That sent me looking for other options. Enter THE PATCH.
 patches2 3-22

I am not a fan of store-bought patches. I hate the look of them and they never seem to stay on anyway. So, I had to get creative.

patches3 3-22

I searched through my scrap fabric and found some decorator-weight fabric by the lovely Anna Marie Horner left over from some previous project. There are three patches in all.

patches 3-22

I used the blanket stitch to attach two of them and a simple straight stitch to attach the other one. I did a simple straight in an X across the center of all three.

patches pants 3-22 
DeAngelo loves them. I don’t know if they’ll stay put. I don’t know how long they’ll last. I’m just keeping my fingers crossed that they last a few months until I can convert these jeans into shorts. I’ll keep you posted.

Love, Kate