Showing posts with label Tips. Show all posts

Wednesday, October 26, 2011

Job Chart

Good Morning,
Nate started preschool yesterday and it's time to get him into a morning routine.  In order to get him started we made a chart on Monday to help him remember his “morning basics” that need to be done after breakfast.  He wanted a picture chart, which I normally do at this age, but instead of doing the basic clip art we decided to actually take photos of the jobs he needed to do.  I turned this part over to him and he loved it.  I gave him the camera and he took the pictures of his bed, toothbrush,  toys on the floor etc.  This gave him something to do and he really enjoyed the process.  Then it was my turn to create the chart.  He loves his new chart.  It now hangs on his door and he’s been very consistent in completing his “morning basics”. So far it's been perfect!

Tuesday, October 4, 2011

72 Hour Kits

Sisters,
Last night for Family Home Evening, our activity included taking an inventory of our 72 hour kits and replacing the food.  I find it interesting that 72 hour kits were first encouraged by the government and after some natural disasters in  areas of our country, we can see the benefit.  The kids loved this activity.  They were excited to be reminded of what they had in their kits and then to  know we were a little more prepared in case disaster strikes our area.  It was a good springboard for discussion.  We put in enough food for three small meals a day as well as a few snacks.  I found small packages of peanuts and almonds at the dollar store as well as individual applesauce etc.  All of the kids also have personal hygiene items in their kits including a comb, toothbrush, toothpaste, soap, sanitizer and Kleenex. Most of them have a flashlight and a notepad for writing.  The four youngest  have little activity kits with crayons, paper dolls to color, paper airplane instructions, a game etc.  We decided that they should have sweatpants, a sweatshirt, clean socks and mittens in case the weather is cold.  Three of the kids also have water filter water bottles to share with the family.  Each kit is stored in a backpack that can easily be handled by children.  It was a great activity, the kids loved it and I love seeing the backpacks lined up in the bottom of the closet ready to go if needed. I would encourage you to consider this family activity if you don't have up-to-date 72 hour kits ready to go.

Tuesday, March 23, 2010

Fresh Lime Juice


Dear Kate,
I've decided to share with you one of the ways I live on a little less. As you know I really enjoy cooking and have found that I like to use my freezer when it comes to saving money. I found limes last week for 12 cents each...what a bargain. I bought 8...should have bought more. Tonight I am juicing them with my little antique hand juicer and then freezing the juice in ice cube trays. After it's frozen I put it in a freezer bag marked and dated. Then whenever I need fresh lime juice for a recipe, I have what I need. It's so convenient and much better than the bottles of juice. I have loved it, especially in fresh salsa in the summer. Each cube is about 2 Tablespoons. I also do this with lemons and with the leftover pineapple juice from canned pineapple. I love the pineapple juice in my green smoothies. You'll have to try it and let me know what you think.

Have a great day in the cold state of Wisconsin. We are experiencing weather in the high 50's...it's been great!
Love,
Amy

Thursday, March 11, 2010

It's a Clay Day

Dear Kate,
I love the clothing adaptations you have made to make them work. I will have to try it. As you know, having a three year old under foot all the time is wonderful, but can also impede some of those basic household tasks. I have found over the years a great way to get my kitchen clean and keep the younger children occupied. When I do a good clean of the kitchen, N gets to play with clay. He loves it and looks forward to the weekly event. I limit the use of play dough because it is such a mess, but it has still been a favorite of my children. While N. is playing, I am able to clean out the fridge, clean the appliances, clean out a couple of cupboards if needed and the other things that need to be done in the kitchen. When I am ready to sweep and mop, the play dough is put away. N. then helps me move the chairs after I wipe them down and he lines up the chairs and plays with those while I mop the floor. It's been a great way to have him occupied and having fun while I complete one of my chores. I do prefer homemade play dough, so here is the recipe.
Homemade Play Dough
4 cups flour
1 Cup salt
2 1/2 tsp. alum
2 Tbsp. melted shortening
2 Cups warm water
Mix and add food coloring.

I store this in a Ziploc bag in the fridge. It keeps for quite a while.

Enjoy!
Amy

Wednesday, March 10, 2010

Tutorial: Appliqué that Stained Shirt!

Dear Amy,
I LOVE the seedlings you’ve started. It makes me realize how close summer is and how I need to get a jumpstart on our garden this year. I’ve bought some books to help us plan better, utilize our garden bounty more efficiently and use our garden space more effectively. I’m so excited! The first signs of spring make me so happy!
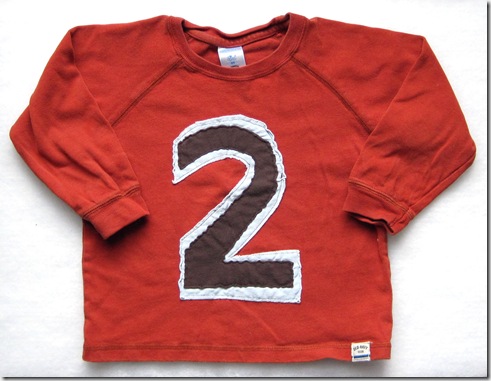
Here’s one more idea for how to reuse kids’ stained clothing. D received a hand-me-down shirt from a friend. The shirt was still in good condition except for some staining front and center and I loved the burnt orange color. So, I set to work trying to figure out a way to keep the shirt while covering the stain.
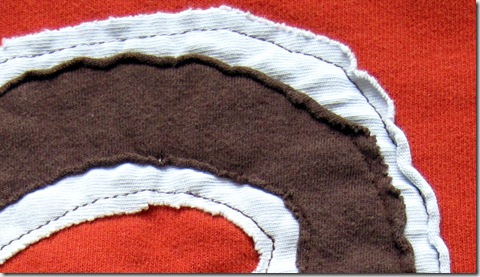
I had some scraps of knit fabric lying around from a skirt project (Re-using old t-shirts…I’ll tell you about that later.) I decided on a number 2 appliqué because of D’s impending 2nd birthday.I picked two colors from my scraps, a dark brown and a pale blue, and cut out a number 2 freehand from each color. I made the 2 from the darker color slightly smaller for a layered look.
If cutting your design freehand makes you nervous, I recommend finding a font or picture you like on your computer, adjusting the size and printing it out to use as a template.
2 close
I centered the larger 2 on the shirt and pinned it in place. I quickly sewed it on, careful to sew through only the front side of the shirt. I centered the smaller 2 over the larger one and pinned and sewed it in place. Knit fabric doesn’t unravel, so I left the edges unfinished so they they would curl when washed.
2 shirt
As you can see, I wasn’t super precise, but I love the outcome. And D loves his 2 shirt. The entire project took about 20 minutes.
What do you think?
Love, Kate