Wednesday, October 26, 2011

Job Chart

Good Morning,
Nate started preschool yesterday and it's time to get him into a morning routine.  In order to get him started we made a chart on Monday to help him remember his “morning basics” that need to be done after breakfast.  He wanted a picture chart, which I normally do at this age, but instead of doing the basic clip art we decided to actually take photos of the jobs he needed to do.  I turned this part over to him and he loved it.  I gave him the camera and he took the pictures of his bed, toothbrush,  toys on the floor etc.  This gave him something to do and he really enjoyed the process.  Then it was my turn to create the chart.  He loves his new chart.  It now hangs on his door and he’s been very consistent in completing his “morning basics”. So far it's been perfect!

Monday, October 24, 2011

Jackson, the Jack-o-lantern

Sisters,

Even though I was a couch potato (quite literally!), it was a great weekend. Alex took the girls on several different outings, one of them to a pumpkin patch. They picked out a huge pumpkin that they carved Saturday night. They named him Jackson and were absolutely delighted with the entire carving process. It was such fun to watch them sit on the table, reaching their hands into the pumpkin to take out his "guts," all the while giggling with delight.


After lighting the candle to set Jackson a glow, Alex put Eliza on his lap and said in a quite voice, "Jackson might just grow a body while we are sleeping tonight and come to life!" I don't think he thought she would take it so seriously. Later that night, about an hour after putting the girls to bed, we heard Eliza screaming in terror. We both ran into their room (well, me a little slower than running). Zoie had woken up and climbed into bed with Eliza. Eliza was startled awake with a body next to her thinking it was Jackson, the Jack-o-latern, come to life! She was crying out, "It's Jackson, it's Jackson! He's in my bed!" It was hard not to laugh. Zoie started crying too in fear that Jackson was somewhere in the bed. It was quite the commotion! It took a few minutes to calm them down and explain that daddy was just being silly. We took them into the kitchen and showed them Jackson... sitting on the table where we left him. But, Eliza has still confirmed multiple times now with me that Jackson doesn't really come to life when we go to sleep. What a sweetheart!


Hope you all have a happy and spooky Halloween!

Monday, October 17, 2011

My First Canning Adventure!

I know, I know, all I've been writing about lately is food! Well, that's what my life is all about right now. I love living in a bigger house so that we have room for some food storage! FINALLY! As most of you already know, Rit and I bought a new refrigerator a couple of months ago. I LOVE THIS THING! I know it's silly to fall for an appliance, but it seriously makes my life so much easier. I love the extra space, the great lighting, and the filtered water in the door. I drink so much more water now! I hated washing and filling up our old Brita filter in the fridge before. Anyway, we also bought a freezer at the same time.

I have never had a separate stand-alone freezer. It's a whole new world. I. Love. It. I have been spending a lot of time lately roasting tomatoes, making soups with fresh local produce, and making vegetable and chicken stock...all for the freezer. I'm thrilled with the concept of being able to use local-produce-based, homemade foods all winter. Plus, as silly as it may sound, I find it really satisfying to "put up" food and to see what I've accomplished from this fresh, local produce. I know where it came from and how it was made. I love that!

After listening to Amy's stories of preserving, I decided to try to dehydrate some hot peppers and make our own chili powder. The peppers from the farmer's market were gorgeous and cheap (remember them from my last post?) We also harvested quite a few from our small garden. So, while wearing gloves, I sliced them length-wise in half and removed the seeds. I then dehydrated them. When they were nice and dry, I put them in my beloved Vitamix blender and turned them into powder.

If you try it, just be careful not to inhale when you take the lid off of the blender. It's potent stuff! But it smells heavenly. We can't wait to make chili this winter with our roasted tomatoes and homemade chili powder! Thanks for the idea, Ames!

The boys are in love with dehydrated apples, so I'm making as many as I can. We purchased apples CHEAP from a local orchard. We actually got a really good variety, too.


I bought two dehydrators cheap at a local factory store. They've been running almost non-stop since I bought them a couple of weeks ago. But, in lieu of a dehydrator, an oven can also be used to dehydrate apples. First peel, core and slice your apples. As you slice them, place them in an antibrowning bath. You can make the bath by crushing and dissolving 6 500mg vitamin C tablets in 2 c. of cold water or by adding 1/4 c. lemon juice to 2 c. cold water. After 10 minutes in the bath, remove and pat the apple slices dry. If using the oven method, place the slices on a cake cooling rack and place the rack in a 170 degree oven for about 3-4 hours. If using a dehydrator, place the apple slices on the racks in the dehydrator, careful not to overlap. The time in the dehydrator depends on the type of dehydrator. The slices are done with they are leathery and won't stick together when squeezed together. Cool and then place them in a covered container for one week. If there is no moisture in the container after one week, transfer the slices to an air-tight container and store for up to one year. If moisture is present, try dehydrating longer.


So aside from dehydrating and freezing, I tried my hand at canning this weekend...for the first time! I was a little intimidated, but I read a lot before I got started and I hope I did it right. I have to wait a little longer before checking to see if my jars sealed correctly.


I used a variety of apples. I did core them, but I didn't remove the skins as that is where so many nutrients are found.

I didn't add any sugar at all, just lemon juice and cinnamon. It's delicious! I canned 8 quarts so far and made some to keep in the fridge, which Rit has almost finished off already.

I am loving all of this preserving and I look forward to another week of it. It's getting me even more excited for my big garden next year. YEAH!

Love, Kate

Friday, October 14, 2011

Ramblings

Sisters,

I don't have anything real substantial to post about, just a few random thoughts:

* Isn't this a great quote? “The only way to get through life is to laugh your way through it. You either have to laugh or cry. I prefer to laugh. Crying gives me a headache.”― Marjorie Pay Hinckley

* I just found this recipe on a blog I like to follow and I can't wait to try them. Pumpkin + Ginger = DELICIOUS! I think I will commission Alex to make them this weekend. :)

* I watched this Mormon Message yesterday and it made me cry. I am recommitting to enjoying more of those important daily moments that make up my life. And I'm recommitting to being a more patient, gentle, and fun mother.

* A friend of mine brought us some homemade potstickers last week to put in our freezer and take out as part of a quick meal anytime. I had Alex make this soup on Sunday to go with them. Oh how I love this soup! You have to try it sometime soon. I would strongly suggest using the coconut milk and the Madras-style curry powder (which I think you can probably find at most grocery stores). SO YUMMY!

* I've been looking for fun, easy things to do with the girls while on bed rest. We made these spiders last week and they had a ball making and then playing with them. I love inexpensive, cute decorations that you can make at home!

* When my sister-in-law, Liz, was here helping us a few weeks ago, she convinced me to buy this stick vacuum. Ah-mazing! I LOVE it. This is a really quality, fantastic product. It's changed my days!

* I think you have all probably heard by now the funny story of how we now own 4 vehicles.... a 1966 Ford truck, a 1985 Suburban, a 1999 Honda Civic, and a 2005 Toyota Highlander. It makes me laugh every time I walk out to the parking lot to see our fleet. Anyone want to buy a car??? Seriously. I'm not kidding. (Preferably one of the older ones... ha ha!)

* Thank you again, Michelle, for sending us those fun dress up clothes! The girls spend hours every day playing dress up. They just love it. They have never seen any of the Disney princess movies, but somehow they know all of the character's names and take turns pretending to be different princesses.

Dragons, Soup, and Swap

Dragons. I don't have a picture that relates to my post today, but here's a picture of Ethan with "Legend," the stuffed dragon he got to take home from class today. He gets to keep him all weekend and write in a journal that has followed Legend each weekend over the past 10 years that Ethan's teacher has been teaching. He is super excited.

Legend is a very well behaved dragon. I think Ethan will even take him along to a birthday party this evening...should make a fun story for the journal. Ethan is hoping Legend likes pizza.
Soup. Well, we tried a recipe for the first time this week, and it was delish. It was the roasted tomato soup recipe that your mom emailed to us about a year ago. We just barely tried it, and it's fabulous. Maybe you guys have all made it already, but in case you haven't, here it is with just a few changes I would make.

Aunt Joan's Roasted Tomato Soup

Tomatoes (enough to fill a cookie sheet when halved)
1 Head of garlic
1 Onion
Oregano
Basil
Thyme
Ground Pepper
Salt
Olive oil
28 oz. Chicken broth (I just made mine with bouillon)
1 t. Sugar
1 c. Cream

Half or quarter enough tomatoes to fill a foil-lined cookie sheet. Lay tomatoes cut-side up. Cut the bottom off a whole clove of garlic and set cut side down on cookie sheet. Aunt Joan sprinkles with 3 T. of olive oil, but I just sprayed the foil with PAM. Sprinkle tomatoes with salt.

Roast for 1 hr. Cool for about 30 min. or so.

Add 1 T. of olive oil to a large soup pot. Add diced onion and some more salt. Sweat over medium low heat until the onion is tender. Add your choice of spices for the last minute or so. I used oregano, basil, thyme, and fresh ground pepper.

Once the garlic has cooled, squeeze roasted garlic out of peeling and add to the onion mixture along with the roasted tomatoes and 28 oz. of chicken broth. Simmer for about 20 minutes. Then blend the mixture in a blender. Return the soup to your pot and add 1 cup of cream. Serve.

We did make it with the full cup of cream, but I think it would be just as good if you substituted some milk for the cream. Maybe 1/2 c. cream, 1/2 c. milk. It's up to you.

Swap. This week, I participated in a toddler busy bag swap. I know many of you don't have toddlers anymore, but I think it works well for pre-schoolers as well. The gal who organized it sent us this site to choose what activities we wanted to make. We didn't have 20 people interested in participating. We only had 5, so we each chose 2 projects, made 5 each, and then swapped. It was great. Now I have a little bag full of fun activities for Sam. It's great for keeping him entertained, and many of them will work awesome for church as well. Give it a look.

Wednesday, October 12, 2011

Aye Thar Matey!!

I thought I'd share some of our fun this past weekend with you.  Nate turned 5 on Saturday and he really wanted a party.  After a brainstorming session, we decided a pirate party would fit.  We had a great time planning and then partying.

The invitations were scrolls with a treasure map background.  I soaked the papers in herbal tea after printing them (you need to use a laser printer) and then baked them for about 8-10 min to dry them out.  Then we rolled them and burned the edges.  We gave each of the invitees a pirate name.  When the kids arrived they made pirate hats.  All the pirates were then put through training before they could claim their pirate name, so they had to:  pin the chest on the treasure map, walk the plank, have a cannonball combat, disarm cannonballs, learn about the islands in  musical island and see if they could read clues on a treasure map during a treasure hunt.  The pirates received a skull necklace, balloon swords, their hat, eye patches and a loot bag from the treasure hunt to signify their success.  They had a great time. Here is our party in pictures...


You can't have a pirate party without a treasure chest cake.  Nate thought it was great!

I once again realized how much I love planning and having parties.  I think I sometimes shy away from them because I know they consume me and take so much time, but I do love it!  I've decided some of my kids may need to have a Halloween party next!!

Party on!
Amy

Tuesday, October 11, 2011

'Tis the Season!

I LOVE this time of year. Seriously, LOVE. I can't get enough time outside. I love when the air starts to turn a little crisp, a little cool. But the sun is still shining, the sky is still blue. And the leaves...THE LEAVES! They are stunning this year, breathtaking, the colors startlingly vivid and vibrant. I LOVE IT!

I guess it's the part of Dad I have in me, but I long to jump in the car and go for a long drive to drink in the spectacular color. I love driving up to Door County, reveling in the color, and stopping in the small coastal towns for some yummy treats: fresh apple cider, pick-your-own apples, homemade caramels, delicious fire-roasted tomato salsa, baked goods.

I also love the farmer's market this time of year. Since we have never had a very big garden of our own (that will change next year...FINALLY!), we've relied on the farmer's market to supply most of our fresh produce. This fall, the farmer's market has been spectacular.

This was some of my take from our trip last weekend. I'm in a preserving frenzy right now, which is all very new to me. I'm loving it.
tomatillos for fresh salsa

fresh organic garlic from a local farm
yummy hot peppers

just a few of the five-gallon bucket's full of tomatoes

Fresh apples from a local orchard
This is just a little of what my kitchen is filled with right now. I also scored a free-range organic chicken and a couple of dozen farm-fresh eggs. They're so pretty! So far, I've made fresh pico de gallo (We tend to eat this on and with everything.) and a lot of roasted tomato sauce. I saved just enough tomatoes from this load to make some Carrot Tomato Soup (under Tutorials on Soule Mama's website) with the fresh carrots I bought.

Today's agenda: finish planting the plants I can't seem to stop buying and clean out the pots to ready the truck for a trip to the compost. Later this week: tomatillo salsa (thanks for the delish recipe, Ames!), roast peppers, can applesauce, dry apples using my new dehydrators, and get the carrots ready to freeze for use in smoothies. LOVE this time of year!

On a lighter note, I ordered a bunch of snow boots from an online company with free shipping and free returns. I have yet to own a good pair of snow boots during my time here in Wisconsin and it makes my winter experience less than wonderful. My toes get wet and go numb oh-so-quickly. So, my quest for the perfect snow boots has begun. Snow boots are large, right? I was stunned to see that this online company shipped ALL of the snowboots together in one GINORMOUS box. Like, coffin-size. I was on the phone with Dayna when it arrived. I genuinely believe that both she and I could fit comfortably together in said box. IT'S THAT BIG! I almost couldn't get it in the house by myself and I've got some muscles.

The photographic evidence:
whatever...the photo does not seem to want to be righted. Just tilt your head, okay?

On the up side, amongst the many boots it contains, this box holds two very promising pairs of winter boots for moi. Now to whittle it down to one pair.

Now for the gratuitous cute picture of the boys. They love to dress up...every day. They love to put on random items of clothing and hats and blankets and aprons. Here's yesterday's get up:
Again, I can't get the photo to want to stand upright.
Anyway, enjoy the season!

Love, kate

Friday, October 7, 2011

Party Animals

It feels like we've been having one party after another around here lately. First, we celebrated Sam's 3rd birthday once Dave got back from Wisconsin.


 True to form, I made a Spider-Man cake at his request only to have him tell me once it was done that he wanted a dinosaur cake. Wonderful. Ah well, he got over it and seemed to enjoy himself just fine.
 
Then last Friday night I hosted the First Annual Girly Gadd Pajama Party. When we lived in Moscow, ID, I had a friend named Angela Boyle who hosted a party for all her girlfriends every year at Christmas. She made dinner for everyone, and we did a white elephant gift exchange. It was fabulous, and I've always thought it was a great idea to get all your girlfriends together once a year. Especially now that we've moved to a different part of town, I thought it would be a great way to maintain contact with dear friends that I just don't see that often anymore.


I knew that if I didn't just set a date and invite people, it would never happen, so one afternoon I set a date and used evite to send email invitations to everyone. I also knew that me making dinner for everyone this year just wasn't going to happen. Maybe I'll do that some year, but I just wanted (and could handle) to get some friends together for some goodies and chitchat. So for fun I made it a pajama party and served little open-face cucumber sandwiches, raspberry salsa with chips, and macaroon brownies. Dave put out a bowl of Skittles, and they were a hit. I think I might do different kinds of candy in the future...kinda fun.


 Even though I tried to prepare all day, it was still (is always) a bit of a scramble at the end to get everyone fed, nursed, dishes done, etc. So the only picture I have of the spread is one that Sam took at his eye level. I decided to finally try an idea I've wanted to do for some time.  Some nice people from church have given us quite a lot of unexpired baby food that they don't want anymore, so I have a TON of little baby food jars that I've kept to turn into little candle holders. I bought a couple bags of tea lights at the dollar store. Sixteen tea lights for $1. Booyah. I pulled the label off the baby food jars and got the sticky residue off with some GooGone, also found at the dollar store. I just plopped a tea light in the jar and lit it. These would also be really cute with some jute string tied around the top, but I didn't get around to it.


Then we had General Conference weekend, which I love. We are so blessed to listen to the words of the prophets and apostles who have inspired counsel from our Heavenly Father. Dave let the kids set up their individual tents they got for Christmas last year and had them face the TV. We felt very King Benjamin.


Now the kids are enjoying their fall break from school, and they decided they wanted to have a party last night (and tonight.) So they strung up some lights and made up some games for us to play last night before we went down to the fort they made downstairs to watch a cartoon. I love how at my kids' ages all it takes for a good time is a string of lights, a fort, and a bag of popcorn. It's awesome. 

And right in time for fall break, we have had a serious change in the weather. How did we go from shorts to wool socks in 2 days? Anyway, since it turns out you need a gas meter at your house if you've changed over to a gas furnace (Go figure.), we will be without that convenience until Monday. So we will have fires (and space heaters) blazing this weekend.  In the above picture, you may notice the space heater on the table. Babies like to play with space heaters. Tonight for dinner, we decided to take advantage of the coals from the fire we've had burning all day and make tinfoil dinners. Pretty fun. I think I'll do them more often but in the oven to prevent burning. There are so many fun variations, and it's kind of a novelty for the kids.


The heating company's snafoo is kind of annoying, but the fires have been pretty fun. With this cold snap in the weather, I feel so festive and ready for the change in seasons, and now our house feels that way, too.


Thursday, October 6, 2011

Loving the Little Things

Sisters,
I had a great weekend with you and Dave in Wisconsin.  It was so fun to have adult time.  It is always nice to have a break from the constancy of normal life as a mother.  It is also a good time to be reminded of the little things I love.  As I sit in the chaos of my home, I'm reminded that I love being a stay at home mom that lives in the crazy fast lane.  I love listening to Jon sing as he practices the piano.  I love the sound of Nate telling stories out loud to himself as he thumbs through books.  I love seeing Nate dance as he watches his reflection in the sliding glass door.  I love hearing the showers and blow dryers as kids get ready for school. I love hearing all the forks and dishes as they are piled in the sink after family breakfast.  I love the "I love you mom"  "have a good day" and "thanks for breakfast" comments that ring through the morning from 7:20-8:50 as the house empties.  I love hustle of finding shoes, back packs and papers that are needed for a successful day at school.  I love the sound of the phone ringing constantly as the kids try to figure out if they are all riding bikes or not.  I have decided that life is busy and crazy and that being away makes me appreciate even more those things that sometimes annoy me; those things that at times make me feel disjointed.  Thought I'd share my thoughts. Hope it's a good day!
Amy

Tuesday, October 4, 2011

72 Hour Kits

Sisters,
Last night for Family Home Evening, our activity included taking an inventory of our 72 hour kits and replacing the food.  I find it interesting that 72 hour kits were first encouraged by the government and after some natural disasters in  areas of our country, we can see the benefit.  The kids loved this activity.  They were excited to be reminded of what they had in their kits and then to  know we were a little more prepared in case disaster strikes our area.  It was a good springboard for discussion.  We put in enough food for three small meals a day as well as a few snacks.  I found small packages of peanuts and almonds at the dollar store as well as individual applesauce etc.  All of the kids also have personal hygiene items in their kits including a comb, toothbrush, toothpaste, soap, sanitizer and Kleenex. Most of them have a flashlight and a notepad for writing.  The four youngest  have little activity kits with crayons, paper dolls to color, paper airplane instructions, a game etc.  We decided that they should have sweatpants, a sweatshirt, clean socks and mittens in case the weather is cold.  Three of the kids also have water filter water bottles to share with the family.  Each kit is stored in a backpack that can easily be handled by children.  It was a great activity, the kids loved it and I love seeing the backpacks lined up in the bottom of the closet ready to go if needed. I would encourage you to consider this family activity if you don't have up-to-date 72 hour kits ready to go.

Monday, October 3, 2011

Save Some Green by Saving Your Greens

Dear Sisters,

I realize that I may be a little late catching this wave, but I'm glad I finally caught it nonetheless. We try to drink green smoothies with every meal. Because, seriously, YUM. And because in my opinion, there is no better way to get so much nutrition so easily.

My only complaint about making green smoothies is the cost. When available, I try to buy local at the farmer's market or use from our own garden, but there is a large part of the year here in Wisconsin when that is not possible. (Maybe I should look into winter greenhouse gardening...hmmm...) In an effort to cut down on the cost (especially the cost of greens), I try to buy most of our ingredients at a big warehouse store. I can buy organic in large quantities for much less than at the grocery store around the corner. Yes, yes, I know...buy local, support your neighborhood grocery store, yadda yadda yadda. I know. And I try to do just that. However, there are times when the item or items I am purchasing are so much cheaper that it justifies the long drive to the warehouse store. The downside to buying at such a locale is the sheer bulk of the purchase. We are only a family of four, two of which are quite small in stature. How do I keep the greens from going bad before I get a chance to use them?


Say hello to one of my favorite kitchen appliances: The FoodSaver. I'm so in love with this thing that it has a permanent home on the counter top in my butler's pantry. I can think of at least a million reasons why every home should have a FoodSaver (especially at the low price at which one can now purchase it), but the latest reason I love it is the Wide-Mouth Jar Sealer. Yep, for a little over eight bucks, you too can own this beautiful  little accessory.


All of those wide-mouth canning jars we all have piled up in our basement can now be put to good use besides canning. The jar sealer goes over the top of the sealing lid on the jar and sucks the air out while sealing the lid. I then use a screw on ring, even though it isn't necessary. It can't be used for canning, but it can be used to keep things fresh. I use it for nuts, specialty flours, raisins, bulk spices...the possibilities are endless.

But my new favorite use is for preserving greens.


I pre-wash my greens and pack them in jars, seal and refrigerate. Each day, we use one or two jars of greens. You would be amazed how much longer they stay fresh. I also use this method to prepare salads for Rit's lunches. She just grabs a jar and goes. It cuts down on waste from plastic bags and better preserves the food. The jars and the sealer lids can be washed and reused.
\
Now run out and buy one! You won't regret it.

Love, Kate

Saturday, October 1, 2011

Burlap Curtains

We've lived in our house for about 4 months now, and we now have finished (almost) curtains over the front bay window! Progress! Unfortunately, the neighbors no longer get to see me nursing the twins on the couch whenever they pass by. Shucks. I'm sure they're heart-broken. 

One of the reasons it took me so long to get curtains up is that it takes me a while sometimes to figure out what I want. And since I always want something cheap that doesn't look cheap, that takes a while to find. Blinds are nice, but they're expensive, don't add much decoration wise, and wouldn't be very kid-friendly since the windows come all the way down to the window seat that is only 12 inches from the ground. Also, the front windows together are about 115 inches across. Large windows make curtains difficult because panels don't usually come any wider than about 52 inches, and certainly not discount curtains. And since a curtain rod that long needs to be supported in the middle, you can't even just get a third panel to cover the extra. You need four panels. So even if you get a set on sale for about $50-60, that's still over $100 to cover just one window. Anyway, I don't think you need any more of my thought process. Suffice it to say that was more than I wanted to pay.

Burlap crafts seem to be the rage right now, and I saw burlap curtains at The Old Painted Cottage that I wanted to give a try. By the way, I also TOTALLY want to do a sideboard similar to hers with shelves above it in my kitchen...all in good time. But just panels of burlap was too blah, so I wanted to add a ruffle accent as well. Here's what I did.

I measured the window and got enough burlap for four panels across. I rolled the burlap out on my floor and measured four lengths of about 93 inches. Then I sewed two panels together for each side. I then sewed a large 3-4 inch hem at the top and a small hem along the bottom. I didn't bother turning the edge under, because the burlap is fairly stiff. I just folded the fabric over once and hemmed. I also bought some 90 inch wide muslin for lining since we want a lot of privacy in that room. I measured it as well and hemmed the top, sides, and bottom. I did sew these together with a pocket to slide the rod through, but the muslin is too stiff to gather well when I want the curtains open, so we're just hanging the curtains with ring clips.
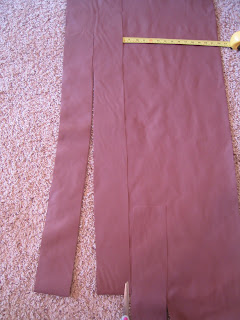


 Here's how I did the ruffle. Your ruffle fabric will need to be twice as long as the width of your curtains so that once you've "ruffled" it, it will still be long enough. I had four yards of fabric. Leaving it folded so I could cut two ruffle lengths at a time, I cut 4 inch strips. I don't mind a bit of a frayed look, so I didn't need extra fabric for turning the edges under for a hem. Since I don't have a rotary cutter and mat, I just laid the fabric on the ground. Using my tape measure, I made small slits along the edge at 4 inch intervals. Then moving the tape measure up, I cut up to those same increments on the tape measure. Once I had the strips started, I folded the strip up, keeping it flush with the left side of the fabric, to use as a guide in continuing to cut the length of my strip on the right hand side. I hope that makes sense. As you continue to cut, it goes much faster because you have more length on your strip to use as a guide. I cut four lengths. One for the top and bottom of both panels for my curtains. You may have to cut more strips and sew them together to get strips long enough to span the whole width of your curtain.
 

 I then separated my strips and sewed a 1/4 inch seam all around the strip to control the amount of fraying.
 
  To create the ruffle, I sewed down the middle of each strip, folding the fabric up about 1/4 inch, sewing 2-3 inches farther down and then folding the fabric under the opposite way. Then I sewed for an inch or so before starting the process again, creating a ruffle that has fabric in front and then behind if that makes sense.


 I then laid my burlap curtain on the ground and marked notches (with pencil right on the fabric since it will be covered by the ruffle) in a line 17 inches from the top and 14 inches from the bottom. I then sewed my ruffle down the line adding a thin blue ribbon detailing down the middle of my ruffle.


 Here's one of the panels while the curtains are open. How to deal with that big, dark fireplace decoratively will be future posts I'm sure.


 I hung the curtains with curtain rings by clipping the rings to the back of the curtain about 4 inches from the top.
 
Here are the panels closed for the night. The pictures aren't great, but the curtain turned out pretty cute. It's a really wide curtain, but I'm pretty pleased with the result. I'm shocked at how well the lines of ruffles match up. Sometimes things work out despite my mediocre skills. Huzzah! The burlap gives a really fun texture to the curtain and pattern when the sun shines on them.

A warning about working with this much burlap: It has a pretty strong smell that will need a few days to air out. It also will leave hairy fuzz all over the floor while you're working with it. But now that they've been up a while, the smell is gone, and I don't notice a problem with the fuzz.

So here's the end cost for the curtains across this enormous window and then across our french doors in the back. About 17 yards of burlap for $3/yd. (50% off coupon at JoAnn's) for $51. Muslin lining for for the front windows for $17 (Another 50% coupon). Four yards of ruffle fabric for $2/yd (on sale) for $8. The ribbon was on sale for $.50 for 10 yards. I used 2 spools for $1. Total cost: $77! Not too shabby. Another reason this project took so long is that I wanted 50% off and had to wait for those items to not be on sale so that I could actually get a better price with my coupon. I had one set of extra curtain rings from a previous project and bought a second set for $4 on sale. Then I had to buy a simple curtain rod for the french doors for $4 at Lowe's. It will be totally covered up all the time, so I could buy a simple rounded one. So even with the hardware, it was a pretty cheap project. It did take more time than I thought it would (projects always do for me), but even though that's a precious commodity for everyone, it isn't a commodity that comes out of my bank account. :)